Saturday, March 08, 2008

Spring Loves

I'm not usually a follower of Spring Fashions. I'm much more of a Fall Fashions person. I love tailored garments, wools, coats, jackets, tweeds, sweaters and the Fall neutral palettes. However, I went to Anchorage (about 1 hour away) today to spend some time with my eldest. And when with Caleb one will sooner or later end up in a bookstore. So it was that I was browsing the magazine rack at Barnes and Nobles and saw the HUMONGOUS Spring Vogue Fashion edition. It must have been 3 inches thick. I thought it would cost a fortune, but it was only $4.99 so I bought it on a whim. And yes...most of the fashions therein can't hold a candle to what will follow for Fall. BUT, BUT, BUT...there was the most gorgeous multi-page spread on floral and hand-painted silk dresses. And this pic below particularly caught my eye as I LOVE mixed prints. I immediately tore it from the magazine and ran downstairs to shop my stash and my patterns. I think I'm going to be able to get a fairly nice RTW knock-off. I will be using bits and pieces from three different patterns. And I think I've settled on three prints: a black irregular polka dot, a lime and white floral and a purple and fuschia floral. But I'm going to force myself to finish my pinstripe shirt and my baby doll dress before I can start it. I'm hoping to be able to start first thing on Monday.

Dries Van Noten Printed Silk Dresses


And these are the fabrics from my stash I'm considering. Sorry about the poor pic. It's still dark and it was difficult to get any lighting for the photo.


PS - And no...I have no current plans to adopt the matching hairstyle.

Friday, March 07, 2008

All Those Not In Favor Signify By Saying..."Weird, Mom."

I've got the dress below almost finished. The sleeves are set in and the upper edge gathered. The neckband is ready to attach (I ditched the quilting idea. Looked homemade-ish). So I slip the dress on to get an idea of fit before putting on the neckband. I'm standing in front of the mirror, still totally waffling about this style on me. My 17yo son walks by, pauses in front of the mirror with me and says "That looks weird, Mom."

Gee, thanks... :( :(

Actually, once I put on black nylons, black heels and accessories, it looked kind of cute. But it only looks good if it's fairly short. Shorter than I normally wear my skirts. If it goes knee length or longer, it starts to look like a nightgown! And while I like the lantern sleeves, on the already baggy, full dress, they're a bit much in the full-length variation. I'm going to do some horizontal tucks at the hem and will do the same on the sleeves to take out some of the fullness.

Jury's still out on this one. I'm going to finish it and then I'm going to have to make up my mind. Because it's rather trendy, it's not the kind of thing you can wear while still waffling between "Do I look cute?" or "Do I look silly?" I'm going to have settle it in my mind so I can wear the thing with a confident attitude.

Of course, that's hard to do when you've got a Tim Gunn wanna-be making snide remarks during your fitting sessions.

Charity

Batter Up!

I bought this pattern not too long ago and decided to give it a quick muslin run from some hot pink polyester plisse microcheck that has been in my stash for about 12 years! I'm really on the fence about this pattern. Have a bit of a love-hate thing going on. I love it in the dotted matte jersey as shown on the front of the pattern envelope, but am not crazy about it in a solid. I think the style is so plain that unless its made from a trendy print, it starts to smack of "grannies housedress." I'll post a pic when I get a little further along. Because of the raglan sleeeves I can't really get it onto a hanger until the neckband is applied - and by then it's almost done. I will be doing some embellishment on the neckband. Some light free-motion quilting with an overlay of stretch netting and then some hand-beading. Will post pics. I have to make a trip to town tomm and then have church Sunday, so unlesss some time presents itself for photo-taking, it will probably be Monday before I get pics up.


Charity

Thursday, March 06, 2008

UFO #2 - Pinstriped Shirt

Besides the jacket mentioned below, this is my #2 priority UFO to finish up, hopefully before the weekend. It only needs me to complete the 3rd buttonhole triangle tab thingie, topstitch the front closure, sew on buttons, make buttonholes (on those tabs) and hem.

UFO #2


Cuff Detail


Collar and Tab Detail


Back yoke applique and locker loop


So far this one has gone like clockwork with no headaches and frustrations. I've probably now jinxed myself...

UPDATE

I've finished the tabs, the top-stitching on the center front and applying the buttons. The only thing left is to hem and do a snap at the base of the collar. This will be finished easily tomm. It fits perfectly. Not a fit wrinkle anywhere.

Charity

Frustrated

I'm determined to finish up some UFOs before allowing myself to start a new project. The #1 project I had targeted for today is my red peacoat-styled jacket. It only needs the six buttonholes on the front and the sleeve hems. So I've got two buttonholes done and they are driving me crazy. This fabric is a red stretch twill by Liz Claiborne. It's of excellent quality, but it was a bad choice for this garment. It has too much spandex in it which gives it more drape than is productive in a structured jacket. It drapes more like a shirt on the body. And the buttonholes are stretching as I sew them. They end up buckling and wavy. :( It's really discouraging. The area under the buttonholes is interfaced and they are supported by the facing and its interfacing as well. So I know it's not that the area is insufficiently underlined. Hhmmmrrrphhh! It's making me really grumpy. I'm using very large buttons that will hide the buttonholes, but it still bugs me. The whole jacket is bugging me. It looks homemade to me despite the care I took in double-topstitching, Hong Kong finishes and other RTW details. It's times like these that I doubt the time and expenditure invested in sewing. I really feel like chucking this thing!

UPDATE

This one did not have a happy ending. I could not get the buttonholes to turn out right because of the stretch factor. And I just could not resolve myself to the overall drape of the jacket. I knew that it would forever bug me and I decided to chuck it. I feel guilty about it. It seems irresponsible, but I know it will just sit in my closet unworn. So I can get rid of it a few years from now when I realize I'm never going to wear it or I can bite the bullet and get rid of it now. So...it's outta here. And I have to admit that right on the heels of guilt, I feel relief. I simply was not happy with the jacket.

Charity

Wednesday, March 05, 2008

Today's Find

I stopped in a thrift store today and stumbled across this great stash of vintage patterns from the 50s. And in my size! I'm not sure that I will make them up. They're all extremely form-fitting. I don't think I have the kind of form that calls for a "wiggle dress". But I couldn't resist them for fifty cents each! I also found the fabric in the background, a great silk imitation, for $3.00. There is 3 yards there and I'm hoping to be able to squeeze a dress out of it.


Charity

Tutorial on Using Eyelets as an Embellishment

A Tutorial: Setting Eyelets


The Confession: In the name of honesty, I must first tell you that my own method for setting the eyelets in the tee below was...(drumroll, please)...having my DH do it. Seriously, I was that sure I'd screw it up. As much as I love sewing, I'm a bit of a klutz at fine muscle tasks. And I'm not enough of a perfectionist to get such things right. Dh on the other hand is one of those rare people who does all things well. He can do anything with his hands. So I asked him to set my eyelets for me and he was happy to do it. But can I get credit for taking pics and notes and sharing them with you?

Step One - First, you must make your design decisions. Where will you place your eyelets? How many? Spaced how far apart? What size? Will they stand alone or be combined with a bit of fabric, cord or chain woven through the holes? Most of effective uses of eyelets that I've seen place them along an edge. A neckline. The top of a bag. Placed horizontally along a front closure. Keep in mind that sometimes they might feel abrasive against the skin so you may not want to place them somewhere that you might lean against them. For instance, when I embellished the tee below, I only did the front of the neckline and left the back blank.

EYELET APPLICATION KIT


Step Two - Mark your placement. Shuffle your eyelets around until you have them in the desired positions. Then, with a marking pen, trace around the INSIDE of the eyelet. It's important to get a clear line. I found that my usual fabric marking pencils did not leave a fine enough line. So I used a regular ball point pen. The circles were eventually covered by the eyelets so this does not leave a mark where it will show. (SEE PHOTO)


Step Three - Decide if you need to interface under the application area or not. On bulky fabrics this may not be necessary. Otherwise, it is advised to interface the area underneath the eyelets. If the fabric is prone to excessive raveling, it might also be helpful to apply a little liquid fabric sealant to the raw edges. (SEE PHOTO)


Step Four - Cut a hole as marked in Step One. This is really the most critical step. If you cut the hole too big, a raw edge might slip outside the eyelet ring and show. If it's excessively big, the eyelet will simply fall out. If the hole is too small, the eyelet will have to push the excess fabric aside and this will result in a bubble or "stretched out" bit of fabric outside the ring. The fabric will not lay flat around the eyelet. You want the hole to be just big enough for the shaft of the eyelet to pass through. (SEE PHOTO)


Step Five - Using the tool provided in the Eyelet application kit and following the manufacturer's directions, apply eyelet. Basically this means pushing the eyelet piece with the shaft up through the hole, pushing from the right side of the hole through to the wrong side of the fabric. On the right side of the garment, you will put the hammer plate (from the eyelet application kit) up against the eyelet. (SEE PHOTO)


Next, slip on the second part of the eyelet, over the eyelet shaft. (SEE PHOTO)


Slip in the post part of the tool (from the application kit) so that the smaller end slips into the eyelet and the ringed part of the tool sandwiches the eyelet. The long end should point up towards you. With a hammer, give a couple of raps. You don't want to hit so hard as to bend the eyelet, but if you don't hit hard enough the eyelet pieces won't snap together properly. (SEE PHOTO)


FINISHED EYELET


Design Inspiration Photos


Tuesday, March 04, 2008

Eyelet Paranoia Revisited

Okay...finally finished this t-shirt. DH set the eyelets for me because I was just too scared I would screw it up. He had problem with one eyelet. Because this is a fairly soft knit, the holes tended to stretch quite a bit. On one eyelet the raw edge of the hole kept pulling out of the eyelet rim. We solved this by adding interfacing directly under the hole as the interfacing simply on the facing didn't seem to be adequate. This looks really cute on, but I am a bit too self-conscious about my weight right now to model it for you. :( Give me another 10 pound loss first. :)


Charity

Monday, March 03, 2008

Sewing Lessons Day


Can't believe Monday has already rolled around and another sewing day has come and gone. The weeks just whip by! Today we finished up our instruction on seams and seam finishes. We focused on Creative Seaming Techniques and learned how to do slot seams, fringed, fringed and overlapped, bound and overlapped and selvage seams. I had been wanting to learn how to do slot seams so I learned right along with them. The girls made samples of each completing their worksheets on Seams and Seam Finishes. Next week we will move on to appliques, eventually covering more than a dozen different types of applique before delving into fabric modification techniques.

On the project front, Emily began cutting out and marking the pieces for her lined and hooded "furry" coat. She keeps picking difficult fabrics and lined garments with many pieces and zippers. I think the girl has a self-destructive streak. :)

Sarah finished the final details on the shell of her vest and began tweaking the lining. She has been absolutely driven to achieve a perfect fit and with resounding success. This vest fits her to complete perfection. We started with a basic vest pattern, but she has so tweaked and redesigned that it's practically an original draft for her. I am very impressed with her diligence and patience.

The girls have really progressed. Today I found that I was getting a lot of my chores done between instruction moments with them. Then I realized that they had developed the ability to work fairly independently as they gained mastery of controlling their seam allowances and in their the ability to interpret pattern directions. They no longer needed me hovering right over their shoulder pointing out potential problems or telling them what they needed to do next. They still need reassurance that things are in order before cutting or stitching, but they are almost always right in their perceptions at this point. I simply look it over, give a nod and they're off on their own again until the next step. I'm working myself out of a job! LOL! :) :)

Charity

Sunday, March 02, 2008

Sewing Room

The Husband has been after me to consider doubling my sewing room space (we are in the midst of finishing an unfinished basement). This would mean annexing the area planned for his personal study and I just didn't want to do that. It seemed greedy when most women aren't blessed with ANY designated sewing space. So I've been resisting. However, this week I came home from subbing at the local Christian school to hear the sounds of hammers pounding in the basement. I went downstairs to find that he had torn out the wall between my sewing area and his study. I was getting the space whether I wanted it or not. Well...gee...really...what sewing fanatic in her right mind doesn't want a nice big sewing studio? Especially when it's guilt-free because it was HIS idea and he said-so. :) :)

So, my sewing studio has gone from about 13x11 to 13x22. I have been told to get blueprints to him asap. I've never done this before and it's rather intimidating. What if I don't get it right? This is my one chance. I don't feel I know enough to know what my needs are or will be. I've always sewn at the dining room table. So how am I supposed to know what kind of lighting is best and where it should be placed? Or how many outlets and how many circuits (I don't even know what a circuit is!). I'm at a loss. I've read that one should allow 3 ft of clearance around major fixtures, islands, cabinet, furniture, etc. for traffic patterns. But since it's just me in there, can I get by with less? I'd like a bigger island (cutting center) if possible. I'd also like my machine counter to be a little longer. I wanted to have a flannel wall for designing quilt block lay-outs, but couldn't fit it in to my blueprint and am not sure what to sacrifice to do so.

I've been studying two books on planning a sewing studio, but I'd LOVE help from anyone whose done this before or to whom this kind of thing is play. Please feel free to comment. This is my first blueprint idea...


I have a couple of things that limit how I arrange the room.

1) I want to face into the room, particularly looking towards my fabrics and the door as I sew. I don't want to face a wall and I don't want my back to the door.

2) I want my fabrics out where I can see them. Don't want them enclosed.

3) I want an L-shaped machine counter.

Those are pretty much my must-have's.

Charity

Tutorial On My White Suit Embellishment

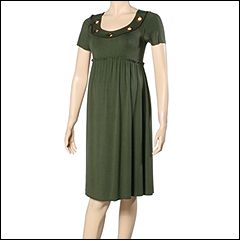
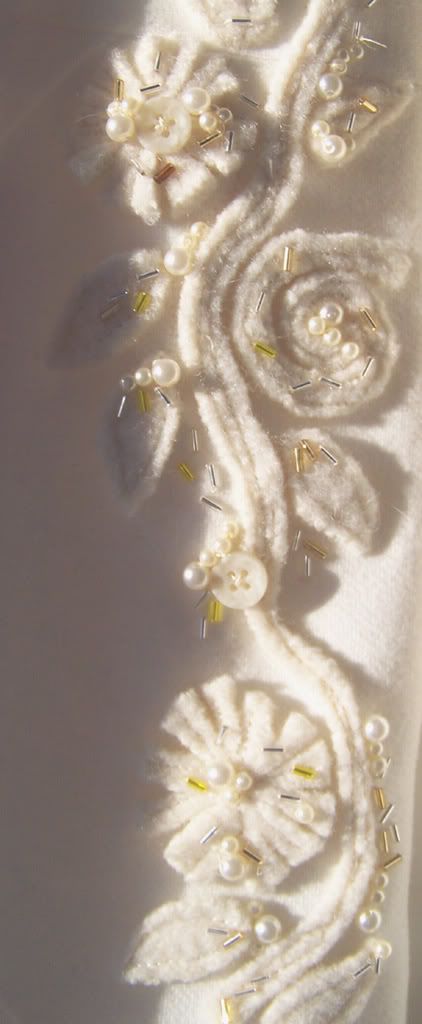
I have had a couple of requests for a tutorial on the embellishment technique used on my white suit below. I'm happy to show you how this was done. It's really quite easy to do.


First, you will need to know how to felt wool. You can use 100% wool fabric, but will get a thinner end result - closer to craft felt in thickness and texture. I prefer to use 100% wool knitted sweaters. I find them at the thrift stores.

Felting Wool Sweaters


1)Remove buttons, zippers and other hardware.

2)Cut apart the garment along seam lines so that you have two flat sleeves, a back and front. Leave on the ribbing where possible because they are sometimes interesting to incorporate in projects still attached (such as using a ribbed hem at the top of a Christmas stocking).

3) Wash the pieces in your washing machines hottest water cycle. Tumble dry on hottest setting.

4) Repeat as desired until you have reached your desired degree of felting.
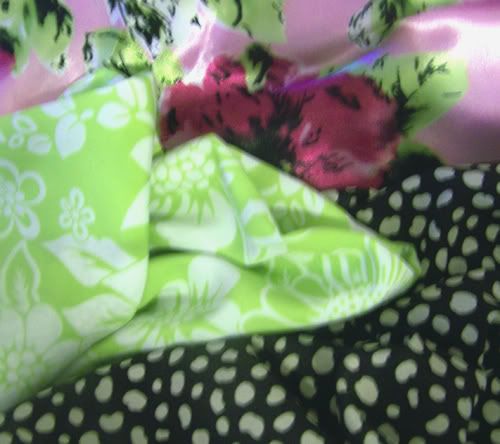

Embellishing Garments with Felted Wool


1) Plan Your Design - After you've felted your wool, whether yardage or knitted garment, then you will sketch out your design. I have collected photos in my files from a variety of places online that feature felted wool embellishment. Simply type in "felted wool" or "wool felt" or "wool applique" into a search engine and you should get plenty of ideas to inspire you. Roughly sketch out your design keeping in mind the item it will embellish. Be sure to allow for seam allowances.

2) Cut Your Design Elements - Next, cut out your motifs and shapes from the wool. You do not need to allow extra to finish the edges. Because felted wool does not unravel you will need no extra margin for turning under or satin-stitching.

3) Layout Your Design - Begin shuffling your wool shapes around until you have a design that pleases you. I find it helpful to take a digital photo on the arrangement to refer to as you begin to stitch the pieces down. Pin the pieces in place.

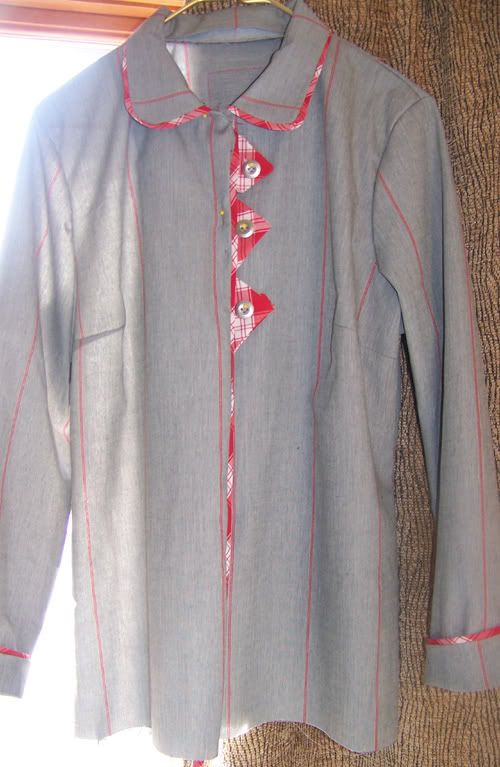
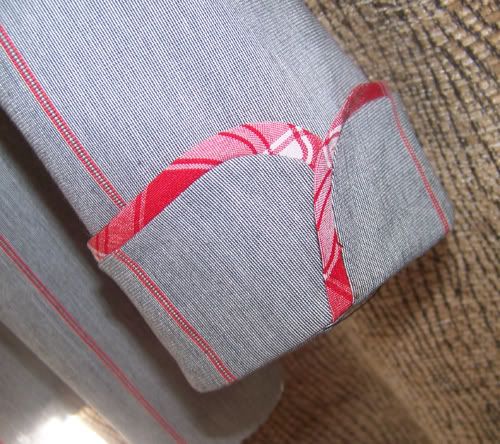
4)Stitch Pieces In Place - Set up your machine with a thread color that closely matches your applique pieces. Secure the design to the garment by stitching very close to the edge of the applique pieces. Very narrow pieces may be stitched down the center. Larger pieces will need to be outlined. Leaves look attractive with the "veins" outlined in stitching. You will need to go slow, pivoting often as you stitch around each shape. Pull thread tails to the back of the garment and knot off.

5) Embellish Design - You may wish to embellish your design with vintage beads, buttons, hand-embroidery, etc. Move to a comfortable chair, grab your reading glasses, set up some good lighting and pop a lllllloooonnnnnggggg movie into the DVD player. Embellish as desired with bugle beads, seed beads, sequins, pearls, vintage buttons, hand-embroidery, whatever your imagination requires. For my jacket, I used bugle beads, pearls and buttons to embellish the appliques simply filling in blank spots and using the beads to bridge design pieces.


Hope this helps!

Charity

If You Like Outback's Brown Bread...

I have had several requests to share my CopyCat Outback Brown Bread. I adore Outback Restaurant's mini-loaves of brown bread. My mother-in-law kindly sent me a copycat recipe she had found. It originally called for a LOT of food coloring. I'm not real big on food coloring for health reasons and started tweaking the recipe so that it would be slightly more healthy. After about a year experimenting with the recipe, I came up with the recipe below. I lessened the sugar and honey, removed the food coloring and added the wheat germ and molasses. Whenever I make it, it just gets scarfed down. Best served fresh right out of the oven. It makes for a very flavorful, yet very tender bread. It's wonderful to include in a meal that you're taking to a sick friend. It's great with a hearty soup. I have made the bread with a greater portion of whole wheat than the recipe below without altering the texture and flavor too much. My attempt to use entirely whole wheat flour made for a really tough crust.

Charity's CopyCat Outback Brown Bread


Place the following into your bread machine in this order:

1 ¾ cup warm water
2 tablespoons butter, softened
½ cup honey
¼ cup blackstrap molasses
2 cups bread flour
1 2/3 cups whole wheat flour
¼ cup wheat germ
4 teaspoons gluten flour
1 heaping tablespoon cocoa
1 tablespoon sugar
1 tablespoon instant coffee
1 teaspoon salt
1 tablespoon bread machine yeast

Run through your bread machine's Dough cycle. Do not bake
in the bread machine. Once the dough cycle has completed,
turn out dough onto a floured surface. Shape into one long
tube about 3 inches across and 16 inches long (very approx).
Cut into 8 equal sections. Place into greased or PAM-sprayed
mini-loaf pan. While I'm not one who is usually fanatical about
name brands, I have found that I get fabulous results with the
Pampered Chef stoneware mini-loaf pan. Let the mini-loaves
rise again and then bake at 350 for 20 to 24 minutes. These
are really yummy served with butter that has been whipped with
honey, orange juice and grated orange peel.

Enjoy!!! I'd love hearing about any alterations or experimentations
you come up with!

Charity