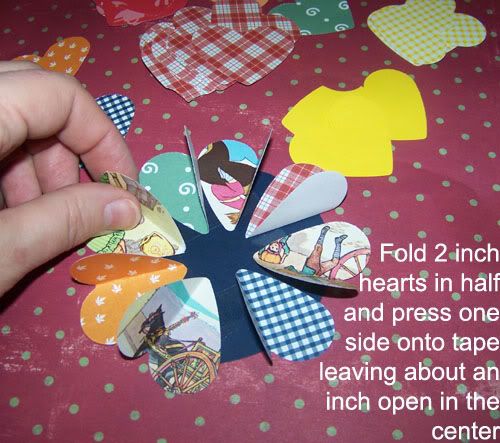
Step One: Cut 4 inch circles from cardstock. Punch a lot of 2 inch hearts from pretty papers in 1930s-styled colors and prints.

Step Two: Place double-sided sticky tape in a square around the interior of the cardstock circle.

Step Three: Fold hearts in half and then unfold. You want them to be partially opened. Press onto the sticky tape having the points towards the center, but leaving about a 1-inch circle of cardstock exposed. The round tips of the heart should just extend over the outer circumference of the circle. Each heart should slightly overlap the next. I like to alternate color prints with text or illustrations punched from vintage children's books.

Step Four: Pat the flower lightly with the palm of your hand. You want to secure the hearts and flatten them slightly while still leaving them partially open to create a dimensional effect.


Step Five: You can finish the hearts by gluing poker chips, vintage buttons or a silk flower in the center. I chose to take apart a silk flower and use only one layer. They were then topped with a miniature spool of thread since this is a decoration for a sewing bee. When the party is over, this will go into my sewing room which is being done in a 1930/40s theme.
To create the garland...
***Rip narrow strips of 1930s repro fabrics.
***Knot ends together leaving tails and tucking a sprig of ivy into each knot
***Staple a paper flower in the stretches between knots. Gently fold a heart back on each side of the flower and staple through flower and into fabric strip. Fold back heart to hide the staple.


4 comments:
Charity, you are the MOST creative person I know! I absolutely LOVE coming to your site. The flowers, needle holder, note pads are just too cute and I know the girls will just love them! Thanks so much for caring enough to send instructions and pictures. Maybe one day I will give it a try!
That's really cute :)
How cute, Charity. Now there's a craft I could probably do!
Leah
http://www.homeschoolblogger.com/lcourtneymom/
How ca-yute!
Post a Comment