
The Confession: In the name of honesty, I must first tell you that my own method for setting the eyelets in the tee below was...(drumroll, please)...having my DH do it. Seriously, I was that sure I'd screw it up. As much as I love sewing, I'm a bit of a klutz at fine muscle tasks. And I'm not enough of a perfectionist to get such things right. Dh on the other hand is one of those rare people who does all things well. He can do anything with his hands. So I asked him to set my eyelets for me and he was happy to do it. But can I get credit for taking pics and notes and sharing them with you?
Step One - First, you must make your design decisions. Where will you place your eyelets? How many? Spaced how far apart? What size? Will they stand alone or be combined with a bit of fabric, cord or chain woven through the holes? Most of effective uses of eyelets that I've seen place them along an edge. A neckline. The top of a bag. Placed horizontally along a front closure. Keep in mind that sometimes they might feel abrasive against the skin so you may not want to place them somewhere that you might lean against them. For instance, when I embellished the tee below, I only did the front of the neckline and left the back blank.
EYELET APPLICATION KIT

Step Two - Mark your placement. Shuffle your eyelets around until you have them in the desired positions. Then, with a marking pen, trace around the INSIDE of the eyelet. It's important to get a clear line. I found that my usual fabric marking pencils did not leave a fine enough line. So I used a regular ball point pen. The circles were eventually covered by the eyelets so this does not leave a mark where it will show. (SEE PHOTO)

Step Three - Decide if you need to interface under the application area or not. On bulky fabrics this may not be necessary. Otherwise, it is advised to interface the area underneath the eyelets. If the fabric is prone to excessive raveling, it might also be helpful to apply a little liquid fabric sealant to the raw edges. (SEE PHOTO)

Step Four - Cut a hole as marked in Step One. This is really the most critical step. If you cut the hole too big, a raw edge might slip outside the eyelet ring and show. If it's excessively big, the eyelet will simply fall out. If the hole is too small, the eyelet will have to push the excess fabric aside and this will result in a bubble or "stretched out" bit of fabric outside the ring. The fabric will not lay flat around the eyelet. You want the hole to be just big enough for the shaft of the eyelet to pass through. (SEE PHOTO)

Step Five - Using the tool provided in the Eyelet application kit and following the manufacturer's directions, apply eyelet. Basically this means pushing the eyelet piece with the shaft up through the hole, pushing from the right side of the hole through to the wrong side of the fabric. On the right side of the garment, you will put the hammer plate (from the eyelet application kit) up against the eyelet. (SEE PHOTO)


Next, slip on the second part of the eyelet, over the eyelet shaft. (SEE PHOTO)

Slip in the post part of the tool (from the application kit) so that the smaller end slips into the eyelet and the ringed part of the tool sandwiches the eyelet. The long end should point up towards you. With a hammer, give a couple of raps. You don't want to hit so hard as to bend the eyelet, but if you don't hit hard enough the eyelet pieces won't snap together properly. (SEE PHOTO)

FINISHED EYELET

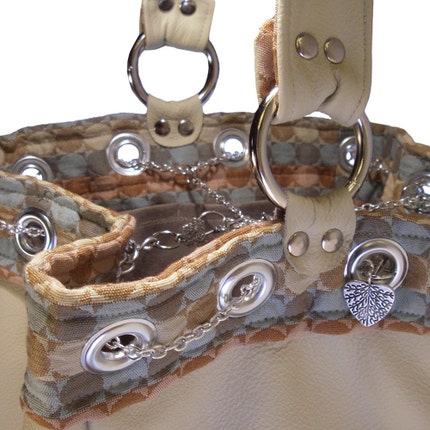
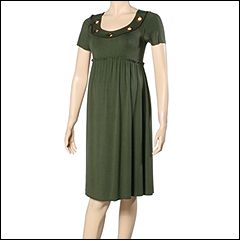
Design Inspiration Photos


14 comments:
Great tutorial - thanks for posting. You always have such great "inspirational" photos.
Charity, thanks for the tutorial. It will come in handy when I make that t-shirt. A question about that red adn white plaid fabric. Are you using that in your PR wardrobe? I like it.
Paula - I might. It fits in with the color scheme and theme, but I have a LOT of print already (love prints) and I'm not sure I can make it go with every item, which the rules require. I love the plaid too. It's a rayon and has a really nice drape, but a bit of a pebbly texture. I found quite a lot of it in a thrift store years back. I use it a lot for trimming things. It looks really cool on the bias as piping.
Hmmm...did you use it on your Daisy Kingdom jumper?
No, but you've got a great memory. The Daisy Kingdom jumper is made up of two plaids and a paisley. I used it in the Hong Kong finish on my red peacoat (Wardrobe Contest, almost done, just have to do buttonholes). And it's trim on a gray pinstripe shirt I'm working on right now. Almost ready to post it. Only have about two hours left on it. I have a draft review on the shirt on PR. That might be where you're remembering it from.
Great info on setting grommets. Love the size of your pics too.
I'm really interested in where the vintage fashions on your sidebar are from. There are some awesome fashions there.
Marj - I love scouting out interesting designs for my sidebar. I change it out fairly often. I simply type in a phrase into the Google Search Engine and then hit "images". I find all kinds of good stuff that way. This sidebar's photos were found by using the keywords "50s prom" "vintage pink dress" "vintage prom" "vintage 50s". Glad you enjoy them. Thanks for stopping by.
I should also add that you can sometimes find bad stuff that way... :( Use caution in selecting your keywords. LOL!
I will confess too that the last time I made a dress with eyelets my husband did them. He did a fantastic job. I am sure that I will let him in the future too. I wouldn't want him to think that I could do without him. :) Your tutorial is great. Thanks.
Most helpful. Love the inspirational pieces also. I have bookmarked this post so I can try this or hmmmm have DH try it for me!
Glad you found the suit pic helpful, Alexandra. If you want more detail pics, go to the Saks 5th Ave. website and look at their women's suits. Its on the second page of them, a Santana, St. John suit for $1,250!
Charity
I love eyelets and this is a great tutorial!
Thanks for the tutorial. I always have a hard time with eyelets. I usually have my dh help as well.
I want the skirt - LOVE IT!!
awesome :D this is exactly what I was looking for! now to get started on my shirt!
Post a Comment