Wednesday, April 30, 2008

Mother's Day Gifts You Can Make - Idea Four


Here's Idea #4 in our series for Mother's Day. Make your mother a beautiful heirloom gift box. These are fun to embellish. Pretty much anything goes! To see all the Mother's Day gift ideas in this post series, click HERE

Materials Needed:

box with removeable lid
decorative papers, sheet music, ephemera, wallpaper, etc.
trims, pearls, beads, buttons, rickrack, buttons, etc.
ornaments for box top such as dolls, teacups, silk birds, florals, etc.
glitter
glue
scissors

Step 1: Trace box bottom and lid top onto paper.
Step 2: Spray box with adhesive glue and adhere papers to top and bottom
Step 3: While glue is still active, wrap paper around box side overlapping ends. Trim off excess with scissors. Repeat with lid.
Step 4: Glue trim, pearls, ribbon, whatever onto box edges to hide paper joints.
Step 5: Arrange a decorative scene on box lid. I have used dolls, silk flowers, birds in nests, teacups, bottlebrush trees, paper cut-outs, etc. If desired, lightly mist with spray glue and sprinkle on glitter or faux snow.
Step 6: Add additional embellishments as desired.

Here are some past keepsake box creations. Some of them are seasonal, but could still give you ideas for Mother's Day.


Tuesday, April 29, 2008

Mother's Day Gifts You Can Make - Idea Three

Dress up your Mother's closet with a beautiful garment hanger and/or cover. In addition to showcasing a gorgeous fabric, you can incorporate vintage linens as well. There are two versions shown here, a hanger with garment shoulder shield or a victorian lace decorative hanger. To see all the Mother's Day gift ideas in this post series, click HERE.

Garment Shoulder Cover Hanger


Step 1 - Procure a sturdy hanger. I get vintage ones at thrift stores very inexpensively. As you can see in this photo, I found these for a quarter each.


Step 2 - Spray paint your hanger if desired to match your intended fabric selection.


Step 3 - Trace around the hanger to create a pattern. Extend slightly over the ends of the hanger and then continue down another 3-5 inches to make a cover long enough to cover the top of a garment to protect it from dust. Mark an opening for the hanger at the top center. Cut out the pattern allowing 1/4 inch for seam allowance. FRUGAL TIP: I use vinyl wallpaper rolls for drafting craft patterns. I pick them up for about a dollar a roll. They don't tear and it's a ton of paper for the money!


Step 4 - Pin pattern to chosen fabric and cut out 4 pieces, a front and back and a lining front and back.


Step 5 - If desired, cut a vintage hankie, tea towel or corner of an embroidered tablecloth to fit the top curve of the hanger. See photo. Pin to the upper edge of the hanger front. Sew front to back using 1/2 seam allowance, stopping at marking for center opening where the hanger hook will slide through. Repeat with lining.


Step 6 - Place hanger cover and hanger cover lining right sides together, aligning edges. If desired, add a trim or ruffle at this point.Sew around bottom leaving a few inches opening for turning to right side. You could add a ruffle or piping to this seam at this time, if desired.


Step 8 - Turn hanger to right side. Press neatly, Whipstitch turning opening shut. Embellish as desired. Insert hanger. Tie a ribbon or tag around neck if desired.

Here's the first one I finished. I'm still working on a blue and pink shabby chic style hanger that I will add to this post as soon as I finish it.


Victorian Lace Hanger


Step 1 - For this gift you will need a padded satin hanger, a wide piece of decorative lace and various pearls, buttons, sequins, beads, satin roses, etc. for embellishment. Cut a length of lace long enough to wrap around the hanger.

Step 2 - Attach lace to satin hanger with tiny whipstitches.

Step 3 - Cover join with beads, sequins, ribbon roses, pearls, buttons, etc.

Lavender Quilt Progress

I have just finished the blocks and layout for the Nana's House quilt. I just need to assemble them into rows. Then the rows get sewn together, the borders put on and it will be ready to do the applique design. I haven't designed that yet, but have some gentler Jane Sassaman-ish designs whirling around in my head. But I have to set this project aside for the day and get some house-cleaning and cookie-baking done. After that, I will be working on today's Mother's Day Gift Idea. So look for that post later this afternoon.

I'm open to name ideas for this quilt.


Charity

Monday, April 28, 2008

Quilting Again!

I haven't quilted in forever and the bug has bitten me big time. A little extra time fell into my lap today because my sewing students weren't feeling well and needed to postpone today's lesson. So...I got to do some quilting! I started a little quilt for an orphanage in Mexico, Nana's House. I had been wanting to make a lavender and grey quilt, but grey quilting fabric proved to be quite elusive here in my Valley. So I opted for lavender and mocha instead as I had a large supply of both in my stash. This will not be a "matchy-matchy" quilt, but a scrappy quilt where I throw in everything I have in the lavendar/mocha colorway. I am doing a simple rail fence pattern, but will then applique a large contempo-styled flower and vine motif atop the rail fence background. I got all the strips cut today and 16 blocks sewn. I will need about 120 blocks to make the approx. twin size quilt I have planned.

Fabrics to be Used - don't have border prints picked out yet


A start on the blocks


UPDATE: It's 10:30pm and I'm heading to bed, but I got a total of about 60 blocks done today. Almost halfway there. I think I'll just keep making blocks until I've used up all my purple quilting stash. Perhaps I'll have enough to make two quilts. I hope to finish the rest of the blocks tomm. and start assembling the quilt. But I also need to finish up some 100 Projects Skirts, so I'll have to play it by ear. 'Night all!

Charity

Sunday, April 27, 2008

Mother's Day Gifts You Can Make - Idea Two

I will be featuring ideas for Mother's Day gifts every day between now and Mother's Day, May 11th. This is Day 2. See posts below for Day One. Today I will be presenting ideas for making two types of sachets. One is made from a vintage glove and the other is paper-crafted. To see all the ideas in this Mother's Day post series, click HERE.

Victorian Vintage Glove Sachet


Step 1 - Procure a vintage glove. These are found in antique stores and boutiques for fairly reasonable prices. I've also found them on occasion in thrift stores.

Step 2 - Stuff the glove's fingers with fiberfill. Then pour in lavendar buds or your desired scent. Finish stuffing with fiberfill.

Step 3 - Hand whip the glove shut at the wrist edge with tiny stitches.

Step 4 - Embellish glove as desired with vintage corsages, millinery, pearls, costume jewelry, ribbon, tags, etc.

Papercrafted Envelope Sachets


Step 1 - Select vintage illustrations, papers, wallpaper, sheet music, etc. to use in papercrafting the sachet. For the ones above I chose to use neoclassical papers by Dover along with vintage illustrations from a children's book of japanese poetry. It seems like an odd combo, but it really worked. Cut your papers to fit the envelope front.

Step 2 - Using spray adhesive secure your papers to the front of the envelope. Embellish as desired.

Step 3 - Fill the envelope full of lavendar buds or your chosen scent. Seal shut.

Step 4 - Presentation, presentation, presentation. Tie a small pile of sachets together with a pretty wired ribbon and tuck in some vintage millinery. Or pile the sachets into a pretty floral hatbox. Add in some bath products for a nice "pamper me" gift set.

Mother's Day Gifts You Can Make - Idea One

I realized today that Mother's Day is only 14 days away! Time to get on top of this. Especially if something homemade is in the works. I'm never quite sure when my Mom might be reading my blog. So I won't tell you what I decided to do for my Mom until AFTER Mother's Day. But I'll be featuring an idea a day for the next ten days. To see all the Mother's Day Gift ideas in this post series, click HERE.

Vintage Illustrations or Wallpaper Notecards


Step 1 - Pick up a pack of cheap blank notecards at your local box store. Or if you really want to be frugal and environmentally conscious, pick up a pack at a thrift store. I am always picking up new-in-plastic packs of notecards at thrift stores for a dollar or less.

Step 2 - Decide on your illustrations. I've used vintage wallpaper, images cut from vintage patterns, children's books, vintage sheet music, even fabric. Cut them to fit your notecard fronts. You may wish to mount your illustrations on a second paper with a little bit of the edging showing as a frame. Decorative edging scissors can add a feminine touch.

Step 3 - Using spray adhesive adhere your illustrations to your notecard fronts.

Step 4 - Embellish cards if desired. You might wish to use colored pencils to add a touch of color to black and white illustrations. Or edge a card with gold ink. Perhaps glue on a rhinestone or a sprinkle of glitter.

Step 5 - Finish your presentation. Tie your cards with a pretty ribbon. Tuck in a sprig of silk ivy and a pretty rose. Add a pretty pin or a pack of floral postage stamps.

Some Inspiration Photos...

Using "The Lonely Doll" illustrations by Edith Dare. Touches of color were added to a BW illustration with color pencils. Then tiny florals, rhinestones and glitter were added.


Using Vintage Patterns


Baby Cards for a New Mother


Vintage Children's Grammar Book (great for a teacher)


More ideas each day till Mother's Day. So stay tuned!

Charity

Saturday, April 26, 2008

How to Mix Prints Tutorial

I love mixing prints in my various creations whether it's pillows, aprons, quilts, strip-pieced skirts, totes, etc. I'm often asked about how I decide what colors and what prints to combine. I thought I'd share my thought processes on this. I have no idea if this is the "technically correct" way to do it, but I always get compliments on the end results, so it must be working for me.

Step 1: Fall in Love - Usually I start with a print for which I have fallen head over in heels. It's usually the largest of the prints and has many colors from which to pull coordinates. Most frequently it's a paisley or a floral, but sometimes a figural print such as a toile. Below is one I found at JoAnn's recently and bought a 1/2 yard to use as an example for this tutorial. I LOVE this print and would probably use it in a quilt or perhaps a Country French-ish tablecloth.


Step 2: Mad for Plaid - Add a plaid or similar geometric. Pull one of the colors from the print to be the predominant color in the plaid, but make sure the other colors match as well. The plaid should be smaller in scale than Fabric #1 so it does not compete.


Step 3: Go Dotty - I like to add a polka dot next. It can be simply one color on a background that coordinates with your inspiration print or incorporate all the colors as this dot below does.


Step 4: Toss One In - Next I will look for a tossed motif print that adds a bit of whimsy. Something a little funky. These little bones are perfect and the blue background is a great match to the inspiration prints blue. If funky isn't appropriate for the project, I may look for a tone on tone print, perhaps in a floral if I'm working with a paisley or a small paisley if I'm working with a floral.


Step 5: Warm It Up or Cool it down - Most of my colors so far are very cool. I need a warm shade to sunny things up. So I chose a yellow. The chicken wire motif also picks up the hint of country that is suggested by the Country French paisley. If I had mostly warm colors so far, then I would cool things down with a cool print. Keep the print small or tone on tone so things don't get too cluttered.


Step Six and Seven: Racing Stripes and a Touch of White or Black - These are two optional final steps. If desired, I might add a stripe. At this point, the stripe is debatable for me. I'm pretty happy with the set so far and I have a geometric with my plaid. So I could go either way. If I was doing a quilt where lots of prints are needed, it would stay. If I was doing a strip-pieced border on an apron, I would probably pass. And then finally...most quilters recommend a touch of a light neutral or a black to give a little punch. I don't like adding in solids to lots of prints. They stand out too much and detract from the happy mix of prints. So if I was going to add a white, I would do one like this that had a very subtle print to it, but at a casual glance appeared mostly solid.


Here are some other mixed prints I've done through the years...

Large Floral Inspiration Print + a small floral + a paisley + a polka dot.


Large Floral Inspiration Print + a small geometric + a polka dot.


Toile + Polka Dot + Stripe + Floral.


Inspiration Print + Plaid - Stopped After Step Two


Tablecloth Inspiration + Plaid + Stripe + Various Tossed Motifs

Fabric Embossing Tutorial

Here is a fun technique that can add texture to your garment. It's simple and can be done with items you already have on hand. You will need to keep a few things in mind when planning your design.

1) The garment will have to be dry-cleaned. Washing and drying the garment will raise the pile and destroy the embossed image.

2) You will want to emboss the pieces BEFORE garment construction. You will need to think through where you wish the embellishment detail to occur. Along a hem? On a pocket? As a border down a front closure? Consider seam allowances, facings and such when planning the placement of your embossing.

Okay...let's begin.

Step One: Select your fabrics. The embossing works best on a garment with a nap. However, I also had some wonderful results on a piece of black wool that had no nap. You will want to do samples before attempting embossing on your garment pieces. I found that too much pile was not successful as well. My best results occurred on wool, terry, textured knit, corduroy, velvet, panne velvet and moleskin.


Step Two: Select your resist. A resist is a textured item that has a raised design that can be pressed into fabric. It needs to be able to resist heat. I found that rubber stamps can work if the heat is not too high or too sustained. Cookie cooling racks, trims, lace, hardware pieces, drapery hooks, even seashells could produce interesting results.


Step Three: Place your resist textured size up on a hard, iron-able surface.


Step Four: Place your fabric napped side down over the resist.


Step Five: Spray the back of the fabric with water. It shouldn't be soaking wet, but more than a light misting.


Step Six: Iron on medium heat for about 20 seconds. The amount of heat and duration of heat will vary according to resist and fabric. Do samples first.


That's all there is to it! Your piece is now ready to assemble. :) Optional idea: You can also try painting your resist with fabric paints and then embossing to add color to your design. To see more samples produced during a recent sewing lesson, click here.

Spring Redecorating

Please be patient with me over the next few days. I'm going to be experimenting with some Spring Blog Spruce-Up. I loved my vintage sepia look I had going, but had become bored with it. After nosing around the Big Sewing Blog List, I noticed that almost all the top blogs have white backgrounds. So..there must be some reader demand for that. And while I love that old antique look, I want this to be a comfy place for my readers. So...feedback welcome. I'm still working on a new Header Banner as this one looks a little "homemade."

Charity

Today's Plans


I have about five Saturday's worth of projects planned for today. I need to get the house looking pretty first. Then I want to do some baking for DH. The man has been soooo sweet to me lately. That's probably a day's worth right there, but I also want to get several tutorials up by midnight so I can enter them in Sew Mama Sew's tutorial contest. I have plans for one on embossing fabrics, stenciling fabrics, how to mix prints, adding decorative bands to towels, sewing twisted tucks and sewing sharksteeth. Okay...that's probably a week's worth right there. And then I want to finish a toddler's 4T tunic, a UFO from way back. I also have two skirts for the 100 Skirts Project to finish up, photograph and post. And... And... And...

Better get busy! Will post progress when and if I make any.

Charity

Friday, April 25, 2008

Three More

Alison has contacted me volunteering to sew two Girls 14 and One Misses Small. This brings our total to 103. Thank you so much, Alison! Our new size chart is as follows:

Size 3T: 10 – DONE
Size 4: 5 Sewn/Promised (Extra sizes. We do not need to reach a total of 10 here)
Size 5T: 11 - DONE
Size 6: 10 - DONE
Size 7 – 10 - DONE
Size 8 – 11 - DONE
Size 10 – 10 - DONE
Size 12 – 11 - DONE
Size 14 – 6 Promised/Sewn, 4 Needed
Size 16 – 7 Promised/Sewn, 3 Needed
Misses Small – 5 Promised/Sewn, 5 Needed

I have some tutorials and giveaways coming soon. I have been in and out of town the last few days and substitute teaching as well. So thank you for your patience and I'll get to it as soon as I can.

Charity

PS - Paula...did you send some of your nasty Puget Sound snow this way? We had Spring well in hand and then...BAM! All of a sudden we're in the middle of a nasty snow storm!

Thursday, April 24, 2008

ONE HUNDRED SKIRTS!!!!

Drumroll, please....

I was contacted by Liz from the lovely state of Utah this morning. She wants to make some skirts in the larger sizes so that brings us to the grand total of...

100 SKIRTS!!

I don't know which size and how many, so I'll just count it as one skirt and put it in the grand total, but not the size chart. Thank you so much, Liz! So....where do we go from here?

This is what I'll be tracking from here on out. I will take and post pics of the skirts as they arrive at my home. If you wish to have a link to your blog or website, please include that in your package. And don't forget to name your skirt for the tags! :) I will keep a running count of Skirts Received vs. Skirts Promised to help us stay on track with actually having the skirts finished and ready to ship by August 1st.

Also, please feel free to continue to join in, if you wish. I don't want to leave anyone out who wants to participate. And we do have a few sizes that don't have 10 skirts simply because I have extras of some sizes and some skirts were promised, but no sizes designated. I intend to continue sewing all the way up to August. I want to have a little extra margin just in case some skirt donors were unable to complete their donations. And I'd love to have some extras for the new orphans that will be arriving when more dorms are built.

There are no words to express how much I appreciate each and everyone of you. This project just got away from me...in a good way. I had fully intended to sew 100 Skirts. However, the power of community, even a "virtual" one, had a different idea. I like it this way even better. A wonderful statement of good will and compassion. Ya'll are awesome!

There will be a MAJOR giveaway in honor of reaching our goal. I will be putting together a nice big goodie box soon as well as some smaller prizes. Stay tuned for your opportunity to win!

Hugs and Kisses

Charity

Wednesday, April 23, 2008

What The Cat Dragged Home

Well...the truck deal was declined. BUT Dh was true to his word and we were at the dealership bright and early to begin negotiations on the craft inventory. I had high hopes of walking off with most of the stash, but the boys-with-tires had dragged in a woman to go head to head with DH. So we lost our bargaining edge right off the bat. She knew what was what. There was no way she was going to let me walk off with $10,000 worth of inventory for $500. Shucks! But she did agree to do some selling by lot prices and we got her down to .25 a fat quarter. I began digging through boxes and drawers and shelves, setting aside my finds while DH and she began their wheeling and dealing. An hour or two later, I had about $1600 worth of inventory for $200. I wanted a lot more, of course, but it was absolutely overwhelming to try to make decisions when nothing was easily accessible. Major contortions were involved to try to get to quite a few of the drawers. I had to move a bike, a kayak and an antique commode. Since I didn't know any of the prices nor what she would agree to, I had few parameters to try to prioritize what to buy and what to set aside. Now that the initial foray is over and I'm more familiar with what they're willing to let go cheaply and what is set in stone, I will most likely make a couple more trips back. I'll probably even load up the car with some of my teenaged sewing buddies and make a field trip out of it.

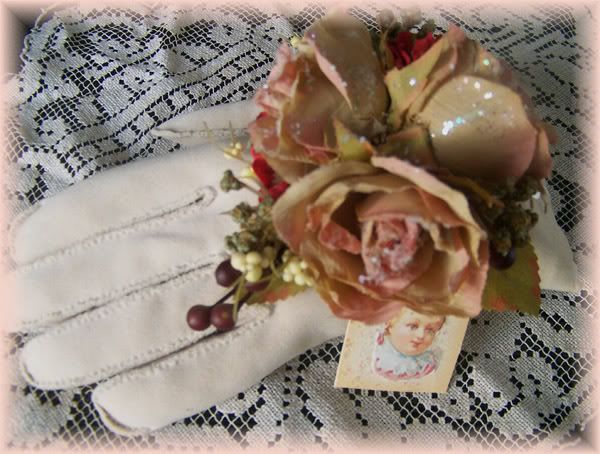
So this is what I got...

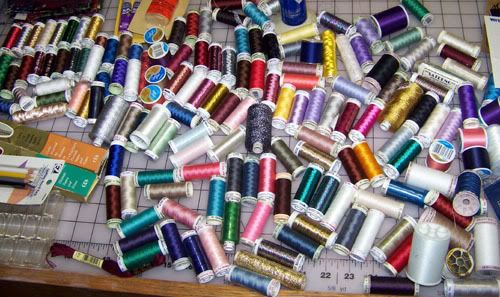
106 spools of thread - Mostly Gutermann, Mittler and some specialty threads like metallics, fusible, blending filament, etc.


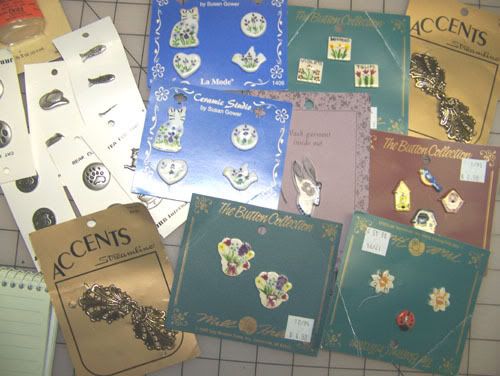
17 cards of hand-made porcelain, pewter or sweater clasp buttons, many of them with $6.00 price tags on them.


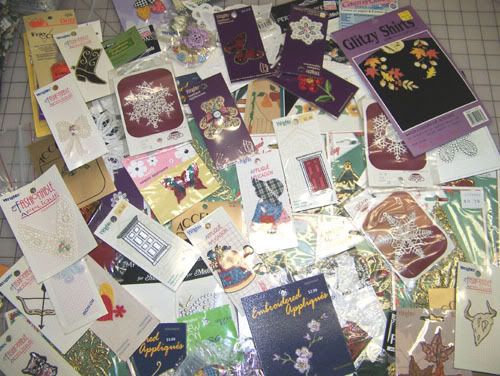
73 iron applique patches, applique kits with pre-cut pieces, metal filigree craft appliques


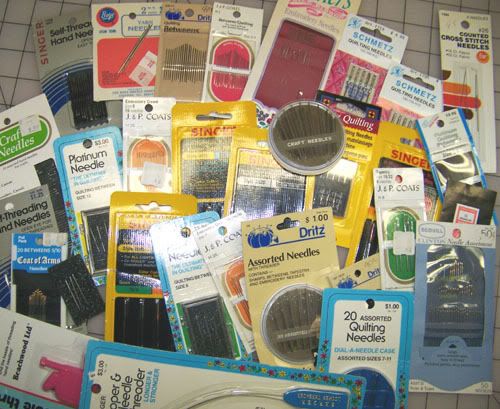
30 packs of platinum, gold-topped, cross-stitch, silk ribbon, tapestry, hand-sewing, quilting machine needles, sewing machine needles, etc.


11 needle cases, 7 of them hand-painted with Alaskan wildflowers. I will probably do a give-away on some of these. So stay tuned.


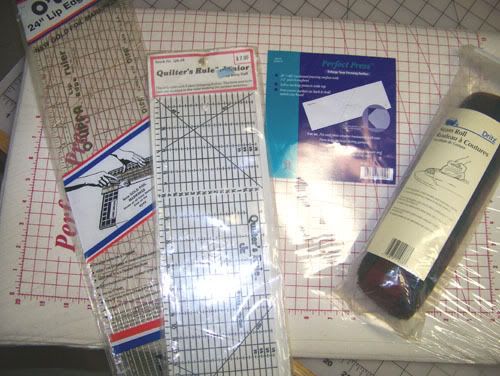
A 5 ft. Pressing pad (needed that!), a seam roll, two rulers


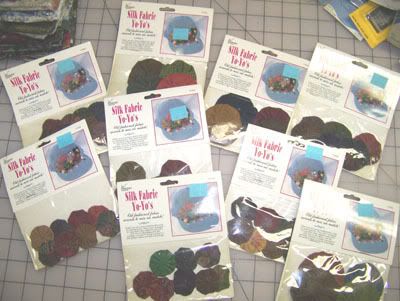
9 packs of SILK (!) yo-yos for embellishments. This will be perfect with felted wool leaves and vintage buttons to make folk art flowers.


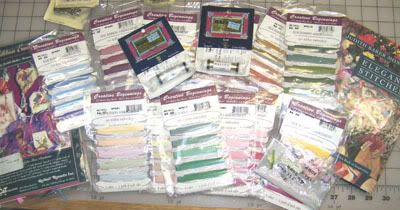
A complete color card set of 11 silk ribbon embroidery hanks, Judith Montano's silk ribbon embroidery book, Elegant Stitches, a $30 silk ribbon necklace kit, assorted related notions.


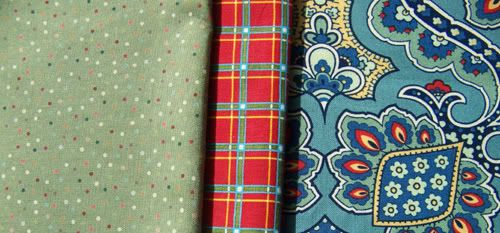
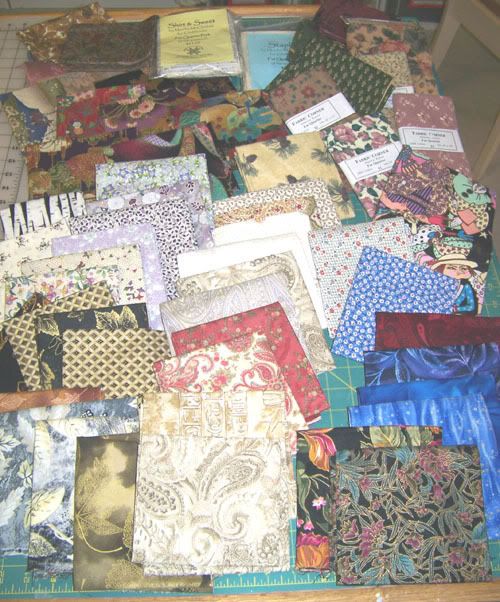
67 quilt fabric cuts, some FQs and some 1/2 yard cuts (.25 each!)


Not pictured strictly because of bandwidth issues...

applique scissors
rotary cutters w/ extra blades and pinking blades
decoupage scissors
komfort-kut scissors
pelican scissors
mini-iron for applique work
several fisker scissors with covers and built-in sharpeners
30 packs of quilting pins, silk pins, glass head pins and other pins
two pincushions
two Simplicity Giant Sewing Books
one memory quilt book
one sewing journal
24 yards of vintage lace trim
huge lot of assorted knitting, crochet notions, bodkins, loop turners, gadgets
cute decorative magnets and tacks for bulletin board
patterns
two adorable broaches made from antique quilt pieces under glass - $19.95 retail each. I got them for $1.00!!
a package of the most adorable tiny vintage chenille chicks

I will be back for more! To my Alaskan readers, I'm now willing to share my secret. :) Hope you don't think I'm awful for getting there first. :) It's the Family Flea Market in Eagle River! Don't let the awful storefront put you off. It's way in the back, but be prepared to really work for it. Have fun and leave something for me. I have a birthday next month and I know where I'm spending my birthday monies! :) :)

Charity