
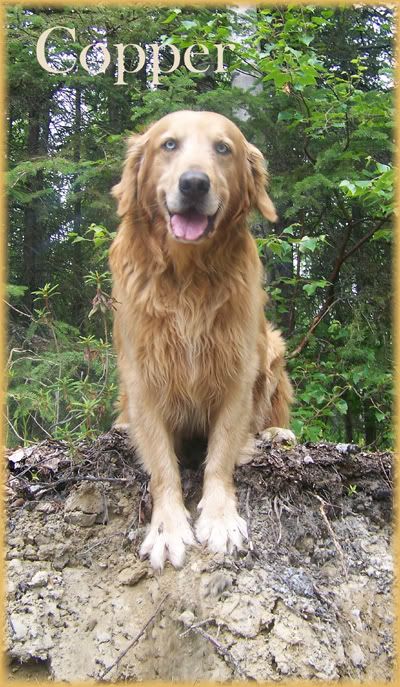
I was wrong...today is the day that we had to say goodbye to our much beloved, sweet and gentle Copper. While he had rallied this morning to the point that I thought he was going to make it, he began to fail just an hour or two later. I rushed him in for an emergency visit. Copper was determined to have a large, bleeding tumor on his heart. It had been there for some time. Nothing could be done. I guess doggie cancer is one of the more common things that take Golden Retrievers from their adoring owners.We decided that it wasn't about us and our desire to hold on to him at this point. It was about his comfort. He needed help to pass peacefully so we saw to that. We took a dog paw print, some locks of his hair and petted and loved on him until he was gone.
I thought that knowing he had had a long and happy life would help. I thought that knowing there was nothing we could have done or could do, might help make it easier to let him go. I thought that knowing we were easing his suffering would lessen our pain.
It doesn't.
Saturday, April 12, 2008
There's Got To Be A Morning After
We have a very old Golden Retriever that we have had since he was a puppy. We picked him out of the litter ourselves. The vet has told us that his life expectancy is 8-12 years. He'll be 12 in September. He has been in great health. Still has all his teeth in good condition. Very little joint issues. He might be occasionally a little reluctant to jump in the back of the SUV. He still runs with DH (short, slow jogs). Still chases a ball and can jump into the air.
Friday he wasn't feeling well. I thought he might need a dose of worm meds, but it became obvious quickly that it was something much bigger than that. A few months ago he had what seemed to be a seizure episode from which he recovered fine and was right back to his usual forever-the-puppy ways that are definitive of Golden Retrievers. This quickly developed into another one and this time I thought we were going to lose him. He was quite lethargic. He begged to go outside, but then had to be blanket carried back into the house (he's too heavy and big for me to pick up alone) when he collapsed and could not get up. Casey and I carried him into the house, made him comfortable and I talked to DH at work. We had decided that we weren't going to go to heroic efforts to keep Copper alive at the end. That we wanted him to be able to pass on still happy and contented and pain-free. Copper didn't seem to be suffering. He would wag his tail when we spoke to him even if his eyes were shut and he wasn't moving. He breathing wasn't labored. The vet clinic was closed for the weekend. The vet is a friend of ours and we knew that testing would be necessary to determine what was wrong. And we had already decided that we were going to let him pass if he was seriously ill and that we would euthanize if he was suffering in any way. So we decided to wait and watch, loving him, brushing him (which he loves) and offering him water (which he refused).
I slept on the couch near him so he wouldn't be alone and I could meet any needs during the night. He remained seemingly unconscious breathing evenly. At 2 am he began to lift his head and look at me. About 30 minutes later he began to shift his weight around to get comfortable. And though he threw up several times during the night, he never indicated any type of distress. About 3:30 he got to his feet and wanted to go outside. I was reluctant to let him in case he couldn't get back up the steps, but he really wanted to and did make it back in.
This morning he is back in his favorite spot parked just inside the front door where the air keeps the tiles cool for him. He has walked around a few times. Is taking water. Wags his tail and even barked at me when I was playful with him. I think he's going to make it! I know we're going to lose him sometime. Probably soon. He's really pushing the envelope already.
But I don't think it's going to be today... And for that, I'm grateful.
Charity
Friday, April 11, 2008
More Use What You Have Party Ideas...
Continuing party prep with stuff-I-have-around-the-house. :)
Bottles Aprons - Quick labels made from scrapbook paper, fabric strips and images cut from a vintage children's book.

Goodie Bags - Motifs popular in the 1930/40s fused to lunch bags using Heat-n-Bond. Embellished with rag strips and mini-thread spools.
Dress Up Paper Napkins - Yellow Walmart .94 cent paper napkins dressed up with 1930s repro fabrics in a posy motif. Fused with my ever trusty Heat-n-Bond.
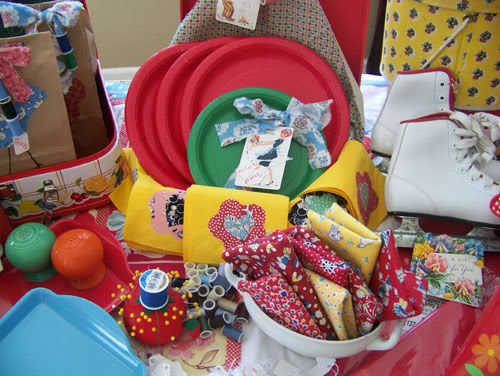
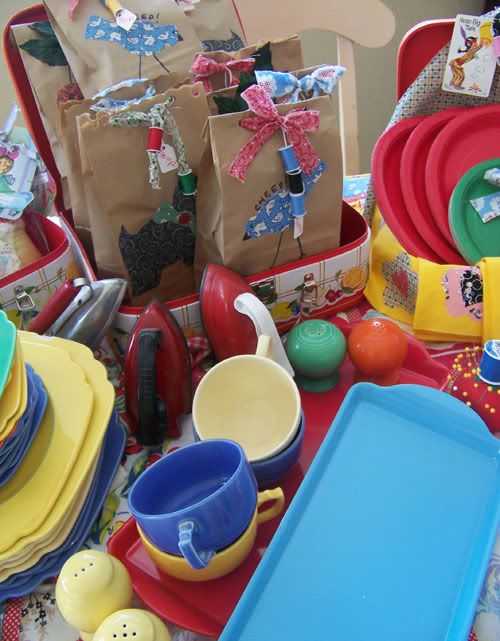
Vintage Rivieraware - My mother's vintage dishes were pulled out of the closet. Their colors are perfect and will be used as serving dishes.
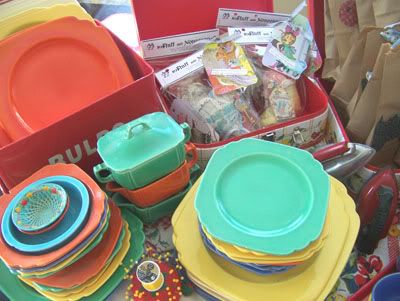
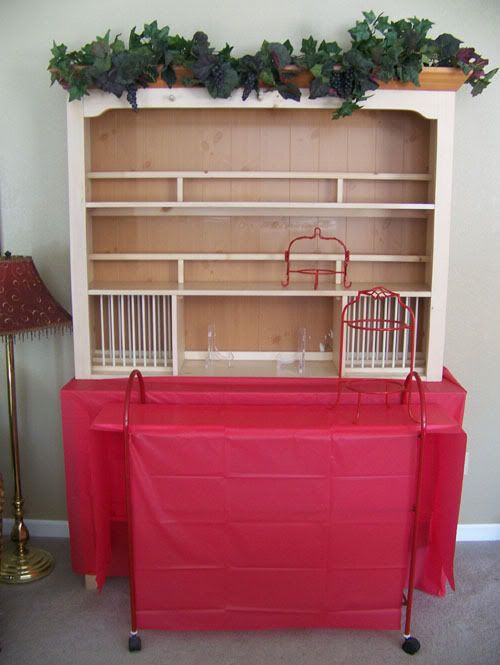
In case you were wondering, the mess in these pictures is NOT my buffet table. LOL! I just pulled out everything I had around the house and piled it on the table for consideration. My two sewing students get the job of "styling" the food service area. They were given the assignment of placing that mess and all the things I've made so far onto this hutch and trolley. I'll take pics on Tuesday after we get the food in place. They started playing around today and have done a great job so far!
Now...I've got to quit playing and start cleaning house and fixing food or I'll be starving my guests!
charity
Bottles Aprons - Quick labels made from scrapbook paper, fabric strips and images cut from a vintage children's book.
Goodie Bags - Motifs popular in the 1930/40s fused to lunch bags using Heat-n-Bond. Embellished with rag strips and mini-thread spools.
Dress Up Paper Napkins - Yellow Walmart .94 cent paper napkins dressed up with 1930s repro fabrics in a posy motif. Fused with my ever trusty Heat-n-Bond.
Vintage Rivieraware - My mother's vintage dishes were pulled out of the closet. Their colors are perfect and will be used as serving dishes.
In case you were wondering, the mess in these pictures is NOT my buffet table. LOL! I just pulled out everything I had around the house and piled it on the table for consideration. My two sewing students get the job of "styling" the food service area. They were given the assignment of placing that mess and all the things I've made so far onto this hutch and trolley. I'll take pics on Tuesday after we get the food in place. They started playing around today and have done a great job so far!
Now...I've got to quit playing and start cleaning house and fixing food or I'll be starving my guests!
charity
Thursday, April 10, 2008
1930s Paper Flower Garland
I am almost done with the decorations for Tuesday's Sewing Bee. This evening I finished this paper flower garland. The photos are not as pretty as I'd like because...well..it's dark here in the evening in Alaska. :) But I hope you can see clearly enough to get the idea of how to make these. I will replace with better photos if I get the chance.
1930s Paper Flower Garland
Step One: Cut 4 inch circles from cardstock. Punch a lot of 2 inch hearts from pretty papers in 1930s-styled colors and prints.

Step Two: Place double-sided sticky tape in a square around the interior of the cardstock circle.

Step Three: Fold hearts in half and then unfold. You want them to be partially opened. Press onto the sticky tape having the points towards the center, but leaving about a 1-inch circle of cardstock exposed. The round tips of the heart should just extend over the outer circumference of the circle. Each heart should slightly overlap the next. I like to alternate color prints with text or illustrations punched from vintage children's books.
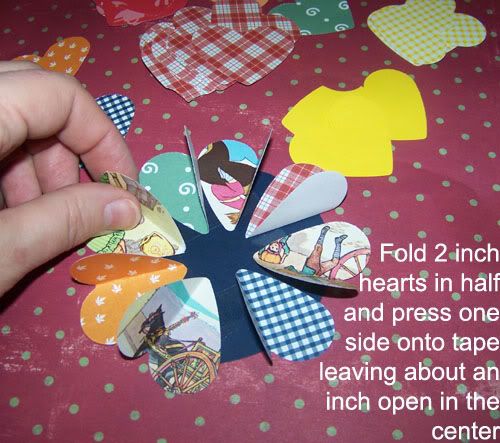
Step Four: Pat the flower lightly with the palm of your hand. You want to secure the hearts and flatten them slightly while still leaving them partially open to create a dimensional effect.


Step Five: You can finish the hearts by gluing poker chips, vintage buttons or a silk flower in the center. I chose to take apart a silk flower and use only one layer. They were then topped with a miniature spool of thread since this is a decoration for a sewing bee. When the party is over, this will go into my sewing room which is being done in a 1930/40s theme.
To create the garland...
***Rip narrow strips of 1930s repro fabrics.
***Knot ends together leaving tails and tucking a sprig of ivy into each knot
***Staple a paper flower in the stretches between knots. Gently fold a heart back on each side of the flower and staple through flower and into fabric strip. Fold back heart to hide the staple.

Step One: Cut 4 inch circles from cardstock. Punch a lot of 2 inch hearts from pretty papers in 1930s-styled colors and prints.
Step Two: Place double-sided sticky tape in a square around the interior of the cardstock circle.
Step Three: Fold hearts in half and then unfold. You want them to be partially opened. Press onto the sticky tape having the points towards the center, but leaving about a 1-inch circle of cardstock exposed. The round tips of the heart should just extend over the outer circumference of the circle. Each heart should slightly overlap the next. I like to alternate color prints with text or illustrations punched from vintage children's books.
Step Four: Pat the flower lightly with the palm of your hand. You want to secure the hearts and flatten them slightly while still leaving them partially open to create a dimensional effect.
Step Five: You can finish the hearts by gluing poker chips, vintage buttons or a silk flower in the center. I chose to take apart a silk flower and use only one layer. They were then topped with a miniature spool of thread since this is a decoration for a sewing bee. When the party is over, this will go into my sewing room which is being done in a 1930/40s theme.
To create the garland...
***Rip narrow strips of 1930s repro fabrics.
***Knot ends together leaving tails and tucking a sprig of ivy into each knot
***Staple a paper flower in the stretches between knots. Gently fold a heart back on each side of the flower and staple through flower and into fabric strip. Fold back heart to hide the staple.
Wednesday, April 09, 2008
Grandma's Needlebook Tutorial
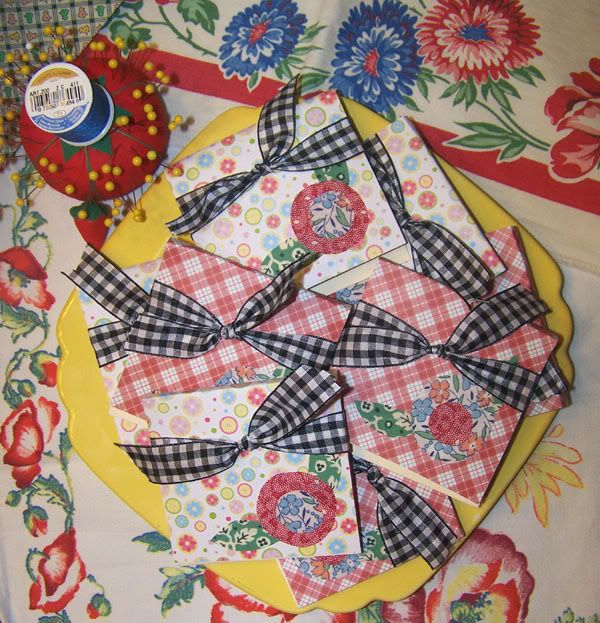
These little needlebook cases are headed for goodie bags for Tuesdays Sewing Bee. They are quick and easy to make so I thought I'd share them in the form of a tutorial with you. They would make great stocking stuffers, shower game prizes, hostess gifts, gift basket addition, etc. They're quickly made with things you most likely have on hand. Plus, I will share tips on how to keep the costs down even further. I made these from 1930s reproduction apron prints simply because I had them on hand, they fit the table theme for the party and because I just adore them. But you could theme your fabrics and applique motif to fit your intended recipient.
Grandma's Needlebook Tutorial

Step One - Create the needlebook's base by cutting cardstock or manilla file folders into the desired size. FRUGAL and TIME-SAVING TIP - I buy notecards at thrift stores for next to nothing and keep them on hand for crafting. I use fusible webbing to create custom cards by simply fusing on scrapbook paper, vintage sheet music and vintage graphics. Or I use them for cutting tags, making bookmarks, etc. They were perfect for these needlebooks. I didn't even have to score the fold!

Step Two - Cut fusible webbing to fit needlebook. You will need two sheets, one for the inside and one for the outside. TIME-SAVING TIP - If you're making more than one needlebook, fold your fusible webbing into as many layers as quantity needed and cut them all at once with a rotary cutter and ruler.

Step Three - Layer webbing onto card and fuse. TIME-SAVING TIP - You can fuse both front and back at once. The heat is sufficent to secure the back side at the same time as the front. Peel off paper.

Step Four - Cut two different fabrics the same size as needlebook, one for the inside and one for the outside. Then layer pieces like this: Fabric for inside of needlebook (wrong side up), card, fabric for outside of needlebook (wrong side down). Slip in a length of ribbon on each end between fabrics and card to provide the closure for the needlebook. Fuse all at once being sure all edges are even. Trim if needed.


Step Five - Trace your chosen applique motif onto fusible webbing. Cut roughly around applique shapes. Fuse to fabrics. Cut out on lines. Arrange on card front. Fuse into place.

Step Six - Cut felt to fit inside of needlebook leaving a bit of a margin. Spray felt with spray craft adhesive. Press into place on inside of needlebook.

Step Seven - Embellish front of needlebook. FRUGAL TIP - Instead of buying tags at scrapbook stores where they come in small quantities and premium prices, I buy mine in the office supply section of Wal-Mart. They are less than a dollar for 200 count.

Step Eight - Tuck in a few pins and needles into felt. Tie shut and it's ready for gift-giving.


Step One - Create the needlebook's base by cutting cardstock or manilla file folders into the desired size. FRUGAL and TIME-SAVING TIP - I buy notecards at thrift stores for next to nothing and keep them on hand for crafting. I use fusible webbing to create custom cards by simply fusing on scrapbook paper, vintage sheet music and vintage graphics. Or I use them for cutting tags, making bookmarks, etc. They were perfect for these needlebooks. I didn't even have to score the fold!
Step Two - Cut fusible webbing to fit needlebook. You will need two sheets, one for the inside and one for the outside. TIME-SAVING TIP - If you're making more than one needlebook, fold your fusible webbing into as many layers as quantity needed and cut them all at once with a rotary cutter and ruler.
Step Three - Layer webbing onto card and fuse. TIME-SAVING TIP - You can fuse both front and back at once. The heat is sufficent to secure the back side at the same time as the front. Peel off paper.
Step Four - Cut two different fabrics the same size as needlebook, one for the inside and one for the outside. Then layer pieces like this: Fabric for inside of needlebook (wrong side up), card, fabric for outside of needlebook (wrong side down). Slip in a length of ribbon on each end between fabrics and card to provide the closure for the needlebook. Fuse all at once being sure all edges are even. Trim if needed.
Step Five - Trace your chosen applique motif onto fusible webbing. Cut roughly around applique shapes. Fuse to fabrics. Cut out on lines. Arrange on card front. Fuse into place.
Step Six - Cut felt to fit inside of needlebook leaving a bit of a margin. Spray felt with spray craft adhesive. Press into place on inside of needlebook.
Step Seven - Embellish front of needlebook. FRUGAL TIP - Instead of buying tags at scrapbook stores where they come in small quantities and premium prices, I buy mine in the office supply section of Wal-Mart. They are less than a dollar for 200 count.
Step Eight - Tuck in a few pins and needles into felt. Tie shut and it's ready for gift-giving.
Use What You Have Party Planning
I finished these little memo pads last night. They will go into the girl's Mother-Daughter Luncheon goodie bags. I am now working on some little needle books, also from 1930s reproduction prints in fabric and paper. Everything is turning out really cute. And so far I haven't spent a dime. It's not that I'm trying to be cheap, but I want to put my party budget into the food as much as possible. That's why I chose a 1930s/40s theme. I have lots of fabrics, papers, table linens, fiestaware from those time periods that I can use as a headstart.
I'm getting excited about the party. It started out as simply a utilitarian get-together to sew skirts as a community service exercise for the girls. But then I decided to try to make it a special bonding time for them and their mothers as well. And the ideas just started to flow. It was meant to be. :) :) I'll share pics of the needle books when I get them done. I don't have any felt on hand and need to run to JoAnn's for a couple of squares. I want to stop by the Dollar Store as well. I'd like to slip in a little sewing kit or seam ripper into their bags. After I get the goodie bags taken care of, I'll turn my attention to the table linens and serving pieces. I have some of those tiered serving racks, but they're in mismatched metals. I think I'll spray-painted them bright red. They were just garage sale finds so it's not like I have a lot of money into them. Then I want to wire a rag bow from the 1930s fabric onto the handle and slip in some faux cherry sprigs. All still stuff in my craft stash.
Sometimes having a big fabric and craft stash pays off.! Here are the memo pads. I didn't do a tutorial on them because I figured they were probably pretty self explanatory. I made the little covers from manilla file folders first so that they were more durable than simply a paper slip, cutting a whole stack of them at once with my rotary cutter, ruler and mat.
Tuesday, April 08, 2008
Party Prep
I haven't sewn a skirt for a couple of days. I hope to catch up this weekend, but right now I'm in the middle of party prep. On Tuesday I will be having four women and their 8 teenaged daughters over for a sewing bee and Mother-Daughter Spring Lunch. The girls will be participating in The Hundred Skirts Project and making a skirt each. I've been planning the menu, table setting and making the thank-you goodie bags for the girls as well as setting up tables, machines, cutting mats, tools and such. I love the Grandmother Apron fabrics from the 30s as well as the table linens from the 40s, so I'll be using those as my inspiration for the table decor and party favors. I also wanted to have a little gift for the mothers. I decided to make vintage baby shoe pincushions for them. I have some adorable vintage shoes in my craft stash so I dug those out and started dinking around. I had so much fun making the shoes below. I thought I would go ahead and offer a tutorial in case you'd be interested in making some of your own. They make great little gifts for a seamstress. Would also be adorable as baby shower game prizes.

Vintage Baby Shoe Pincushion Tutorial
Step One - Secure a vintage baby shoe. These are getting harder and harder to come by as various magazines, craft books and style shows have been featuring them in a variety of crafts and home decor applications in recent years. You can find them on Ebay, but the bidding can get pricey at times. They can also be found in antique stores, auctions, garage sales and thrift shops. I found the shoes below at a Salvation Army. They weren't what I consider cheap at $5.50 a pair. But when I figure that the rest of the supplies for the craft are coming from my stash, that's only $2.25 for a hand-crafted pincushion. I think the basic starter tomato pincushions are at least that!

Step Two - Clean shoe if necessary. I prefer to leave mine looking a little rustic, but some gals like them nice and buffed and polished. You can remove the shoelaces and substitute ribbon if you prefer. I think the tiny baby laces are so sweet and left mine in. Stuff shoe firmly with fiberfill. If you are a purist, you will want to fill yours with emery sand or horsehair instead.

Step Three - Cut a square of your chosen fabric large enough to cover fiberfill and tuck deeply around edges of shoe. Fill with fiberfill. Make a poofy little "ice cream cone" scoop shape with it. Tuck it into the top of the shoe, pushing the fabric edges down into the shoe and rounding things nicely at the open top of the shoe. If necessary, you can run a bead of glue around the edge to hold things in place.


Step Four - Tuck in a bit of vintage lace, rickrack or other trim around the edge. I like the look of the lace because it looks like the shoe has one of those cute ruffled and lace-trimmed socks in it.

Step Five - Embellish your shoe as desired. Bits of millinery, buttons, beads, jewels, pearls, tiny charms and keys. Anything the magpie in you has collected and has laying around the house. Attach with craft glue.

Step Six - Add a sprinkle of straight pins and a little papercrafted tag.


ENJOY!!! You can also turn these into sachets by filling the toe with lavender, potpourri or your favorite scented filler.
Step One - Secure a vintage baby shoe. These are getting harder and harder to come by as various magazines, craft books and style shows have been featuring them in a variety of crafts and home decor applications in recent years. You can find them on Ebay, but the bidding can get pricey at times. They can also be found in antique stores, auctions, garage sales and thrift shops. I found the shoes below at a Salvation Army. They weren't what I consider cheap at $5.50 a pair. But when I figure that the rest of the supplies for the craft are coming from my stash, that's only $2.25 for a hand-crafted pincushion. I think the basic starter tomato pincushions are at least that!
Step Two - Clean shoe if necessary. I prefer to leave mine looking a little rustic, but some gals like them nice and buffed and polished. You can remove the shoelaces and substitute ribbon if you prefer. I think the tiny baby laces are so sweet and left mine in. Stuff shoe firmly with fiberfill. If you are a purist, you will want to fill yours with emery sand or horsehair instead.
Step Three - Cut a square of your chosen fabric large enough to cover fiberfill and tuck deeply around edges of shoe. Fill with fiberfill. Make a poofy little "ice cream cone" scoop shape with it. Tuck it into the top of the shoe, pushing the fabric edges down into the shoe and rounding things nicely at the open top of the shoe. If necessary, you can run a bead of glue around the edge to hold things in place.
Step Four - Tuck in a bit of vintage lace, rickrack or other trim around the edge. I like the look of the lace because it looks like the shoe has one of those cute ruffled and lace-trimmed socks in it.
Step Five - Embellish your shoe as desired. Bits of millinery, buttons, beads, jewels, pearls, tiny charms and keys. Anything the magpie in you has collected and has laying around the house. Attach with craft glue.
Step Six - Add a sprinkle of straight pins and a little papercrafted tag.
ENJOY!!! You can also turn these into sachets by filling the toe with lavender, potpourri or your favorite scented filler.
Monday, April 07, 2008
Sewing Lessons Monday
Sewing Lessons Monday has rolled around again. We missed last week due to appointments I had in town. We had a light session today as we were wrapping up a unit on applique. I taught the girls how to do shadow applique, the last in a long list of applique techniques they learned. You can see how to do this technique in the tutorial below as well as sign-up for a give-away.
We took our time with this last technique. The girls each designed their own applique. Sarah did a funky Mary Engelbreit-ish flower. Emily did a little cow applique that she intends to use as a pocket on an apron. Sarah sketched out the cow for her.
After our technique session, the girls moved on to their individual projects. Sarah finished up her vest, but is rethinking her closures. She is debating whether to do traditional buttons and buttonholes or do loops and buttons or do a lace-up closure. So she has one week to make up her mind. I think after that I will be putting on my Mean Teacher hat and MAKING her finish this vest!
Emily continued work on her fuzzy hooded, lined jacket with separating zipper. An ambitious undertaking for a beginner. Today she did the armhole princess seams and managed to pull it off on the first try. Our Friend The Seam Ripper did not make an appearance. This seam also had set-in pockets that she had to avoid accidentally catching in the seam. She did a great job and was pleased for her jacket to actually start looking like a garment. Next week she will do the princess seams on the jacket back, the shoulder and side seams.
Since we wrapped up one unit, I think next week might just entail a Mystery Assignment. Every once in awhile I pull a Project Runway style field trip out of my little bag of tricks. Gotta keep these girls on their toes...
Shadow Applique Tutorial
Every Monday for a couple of months now I have been teaching the teen-aged daughters of my dear friend, Pamela, to sew (see post above). We spend about an hour learning a new technique or skill and then the rest of the day is spent on their chosen projects. We have been working our way through a unit on applique. We learned needle-turn, fuse w/satin stitch, fuse w/blanket stitch, padded, reverse, Madeira and more. Today was our final day on this unit and we learned shadow applique. This was a technique that was also new to me. We all really enjoyed this embellishment technique and I thought I'd share it with you in tutorial form.
Step One - Cut your organza base in a size and shape that will accommodate your intentions for it when completed. You will need another piece to place over the base. I intended to use my shadow applique for the cover of a needlebook so I cut two squares 8x8 inches. It ended up being a little larger than I wanted once framed with fabric strips and became a door hanger instead.

Step Two - Trace your design onto fusible webbing. Cut roughly around it and then fuse it to your chosen fabric pieces. Cut out on the lines.

Step Three - Peel off the paper backing from your pieces. Arrange the design as desired on your organza base.

Step Four - Fuse into place. Be sure your iron is hot enough to provide a good fuse but not so hot as to scorch your organza.

Step Five - Cover your fused piece with the second organza layer. Pin as needed to keep layers from shifting while you stitch (next step).

Step Six - You will now stitch around the outline of your appliqued design. This can be done by hand with hand-embroidery stitches such as the chain stitch or outline stitch. Or it can be done by machine. Select a thread color to blend with the organza or to strong contrast as desired. Carefully stitch through both layers right on the edge of each applique piece. You will need to stitch slowly and pivot as necessary.
By Machine

Hand-Embroidered

Step 7 - Press your piece. Turn over, pull threads to the back and knot off. Trim tails. Your piece is now ready to use in your chosen application.


FINISHED CRAFT

Now...you are to be congratulated if you read this far..and possibly rewarded as well. :) :) If you leave a comment, I will put your name in a drawing for the little door hanger that was my obliging model for this tutorial. I will do the drawing on next Monday, so you have one week to get your name in the hat!!!
Subscribe to:
Posts (Atom)


